High Flow from the Rogue Performance

Installation Guide!
Do-It-Yourself Guide!
Techno-Jibber-Jabber!
[said in your best Mr. T voice]
This is VERY slick!
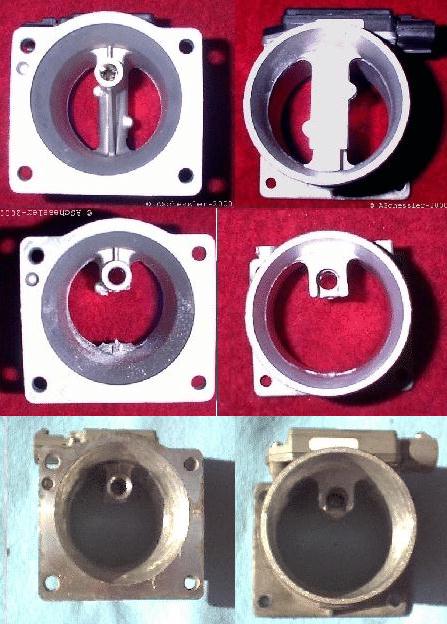
The stock Mass Air-Flow Sensor (MAF) is disassembled and cleaned.
All air flow obstructions are removed, corners rounded and the interior smoothed for unrestricted air flow.
You get more bottom end and a nice "growl" around 3,000 RPM!
Note: This is just the MAF BODY. Ford used 3-6 different calibrations on their
MAF's each year,
so a complete replacement is not practical.
"Other
References" and "
Sources". (Heck! Don't take my work for it, check some other sites out!
You use YOUR MAF electronics to guarantee that the MAF will function properly.
Oh yeah! This is far from stock! This baby will void your MAF warranty and probably fail a "Visual"!
See the Disclaimer for specifics.
Installation Guide
Tools:
8mm Socket
Screwdriver Handle for Socket
Straight Slot Screwdriver (Optional)
Less than 30 Minutes time to install!
Do-It-Yourself Guide!
[said in your best Mr. T voice]
This is VERY slick!
|
so a complete replacement is not practical. |
You use YOUR MAF electronics to guarantee that the MAF will function properly.
See the Disclaimer for specifics.
| Tools:
|
Let's get to work!
-At the MAF, Remove the Air Intake Tube Clamp with screwdriver (8mm Socket and Screwdriver Handle works on most!).
|
|
Or DIY... |
|
 Photos by A Schessler © 2000 and Author © 2000 |
|
Note: Read this instructions completely before starting to decide what you will need. DIY Procedures: -Remove MAF as described above. -Remove the 2 T-20 Tamper Resistant screws: To save the screws for that all important "OEM" look you need to win restoration points:
If you don't give a rat's butt about the screws, you just want ponies:
-Carefully remove the heated wire sensor and "O"-ring from the MAF and store in a safe location. -Remove the 2 T-20 Tamper Resistant screws (using same procedure) from the steel plate inside MAF. Discard plate and small screws. -Using Hack or Coping Saw (best), remove material between the heated wire tube and the base. -Remove upper internal screw boss. -Using Dremel or Files, smooth all cuts flush with surrounding areas. -Round off the 45 degree angle at inlet and all internal casting flash with files or Dremel Tool (use Sanding Drum attachment). -Smooth and polish all internals, DO NOT TOUCH the sample air tube, this can cause running problems. -Clean MAF Body with brake and parts cleaner first (to remove oil residue), then use copious amounts of hot soapy water. Any metal shavings or dust left in sensor will be ingested during engine start-up and can cause serious damage! -Clean MAF Heated Wire Assembly with Electric Contact Cleaner, DON'T touch the wires, if they break, the engine will not meter fuel properly and may not run at all! -Reinstall MAF Heated Wire Assembly and "O"-ring into MAF Body using the original long T-20 Screws (and a drop of gray epoxy in the head of the screw nearest the radiator) or by using 1" long 1/4-24 machine screws, washers and lock washers. -Reinstall MAF in reverse order (stated above). Problems?: Anytime you fix something that isn't broken, you run the risk of causing problems. I'm not saying it will cause problems, just letting you know what MAY happen.
Fix: clean the wires with electrical contact cleaner regularly.
Fix: Connector will stay in place with the tension from the seal for most uses (not during racing or off-road action!). Replace connector by cutting and crimping or releasing each wire internally with a small screwdriver (preferred!)
Fix: Oops, you left the MAF connector off. Reconnect same. If the connector is on, check codes. A code 185, means you broke one of the sensor wires. Replace sensor assembly. Techno-Jibber-Jabber: This war rages on! I understand the MAF, it's interfaces and the consequences of "fooling" the ECU. However, if the mod shows no signs of problems (improper fuel mixture, "idiot lights", overheating, poor mileage), and gives you a boost to boot, I'm not going to concern myself with "backpressure waves", "increased intake noise" and other "non-problems". Why? Because, sometimes "theory" is just that. I'm not saying it is wrong, I honestly believe every word, it's just that the 'consequences' might not be all that dire. Example: Everyone knows you need an equal length on your intake runners for maximum performance, and that they need to be "tuned" to the engine. But when was the last time you saw one from the factory (other than the late 2.3/2.5 Fords)? Look at an old V-8 4bbl intake, not even close. But, they run fine... I'm sure there are forces which I don't understand at work, but as the old saying goes " no harm-no foul"! Just my 2¢... |