Radius Arm Bracket Replacement
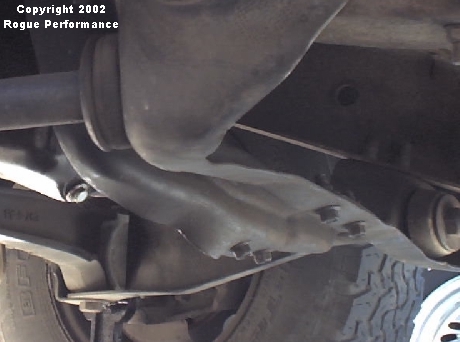
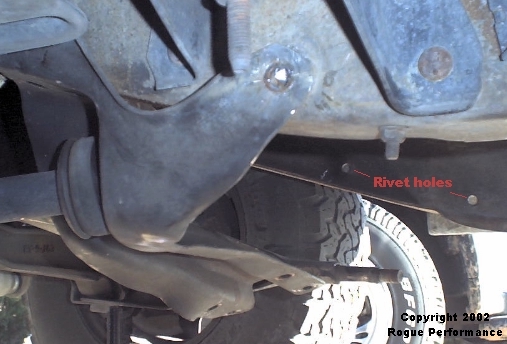
My "Radius Arm Brackets" were "customized" by the original owner.

Yikes!
This requires the use of a few choice tools: (* mark the ones I used)
- "Saws-all"
- Cold hardened chisels*
- ½" Drill Bit*
- Hardened Punch*
- Center Punch*
- 4½" Angle Grinder*
- Penetrating Oil*
- B.F.M. (Big-Friggin'-Mallet)*
- 27mm ½" Drive Socket (for the Radius Arm Nuts)*
- 15mm Open End Wrench (for the 4 frame bolts)*
- 15mm 3/8" Drive Socket (for the 4 crossmember bolts)*
After you cut/grind/drill the heads off of the rivets, use the "B.F.M." and Hardened Punch to drive the rivets through the frame.

The install was simple:
-Loosen the fuel filter (as one of the nuts will be hiding just below it).
-Attach the arms together using the 4 factory nuts and bolts (loose, tightened at end).
-Install the Large curved washers and Large rubber bushings (with "Anti-Seize" on all friction points)
-Install the Radius Arm Brackets
-Install the Plastic spacer, small rubber bushings, and right hand heat shield (with "Anti-Seize" on all friction points).
-Finally, the flat washer and nut (with "Anti-Seize" on all friction points).
-Use a floor jack to lift at the bar portion of the Radius Arm, to get the bracket in position.
-Install bolts and tighten to specs.
-Repeat last 2 steps for other side.
-Tighten the center 4 bolts that tie the 2 arms together.
Parts List:
- Ford Radius Arm Brackets (New $30 each) P/N: FOTZ-3B095-A and FOTZ-3B095-B
- "Anti-Seize" Lubricant
- Bolts (to replace the rivets): 4 M10x1.50-25mm bolts, 8 matching washers, 4 "Ny-Lock" Nuts
- Prothane polyurathane bushings or rubber replacements (listed below)
- Large metal washer (curve facing aft) on Radius Arm: E0TA-3B186-AA
- Large rubber bushing on Radius Arm: E8TA-3B203-AA
- (Then Radius arm bracket)
- Plastic retainer: F07A-3B244-AA
- Smaller rubber bushing: E0TA-3B184-AA
- (Right side only, unless you are running a true dual exhaust): Heatshield (No part number)
- Then a large metal washer (flat) w/ no part numbers
- Finally: ¾-10 Nylon Lock Nut (or similar)
It made a big enough difference that my alignment (Toe) was way out of specs.
Enjoy!
You are visitor number
Free counters provided by Andale.